SHARC II User's Manual
THIS PAGE IS UNDER CONTINUING
DEVELOPMENT
Help Topics:
setting up for the night
special considerations for the first night
observing procedure
shutting down for the night
cryogen servicing
troubleshooting
miscellaneous notes
Setting Up for the Night
Recycling the 3He Fridge
NOTE: If this is the first night of a SHARC II observing
run, please read below in the "warm
detector"
section.
This procedure should be started at least 2 hours before observing.
Recycling is normally handled by the first-half observers, but
please communicate your plans with the CSO staff and any second-half
observers. The recommended starting time is 2 PM.
IMPORTANT: As of January 2011, cycling is done on sharcii again, not
hapuna (which has been decommissioned).
Recycling is done electronically. The Neocera LTC-21 needs to be
powered up, connected to the sharcii computer with a serial cable, and
connected to the cryostat. Two processes need to be running on sharcii
for the procedure to take place properly: a background server which
logs temperatures and controls the Neocera, and a graphical client.
Only one server should be running, but multiple clients can be running.
To see what processes are already running, log onto sharcii -- "ssh
sharc@sharcii" -- and type
"sharcii%
ps -ef | grep java". The server
and client each show up as a java1.2
process. If in doubt about what's running where, kill all of the
java1.2 processes: "sharcii% kill -9
{PID}". For example:
sharcii% ps -ef | grep java
   sharc  9744  9743  0 10:30:41 pts/0   45:01 /opt/java1.4.0/bin/java -Xms64m -Xmx256m -Djava.library.path=./lib/native -cp .
   sharc  9840     1  2 15:00:11 pts/1    0:02 /usr/java1.2/bin/../bin/sparc/native_threads/java -Djava2d.font.usePlatformFont
   sharc  9849  9818  0 15:00:38 pts/1    0:00 grep java
   sharc  9828     1  0 15:00:41 pts/1    0:02 /usr/java1.2/bin/../bin/sparc/native_threads/java -Djava2d.font.usePlatformFont
sharcii% kill -9 9840
sharcii% kill -9 9828
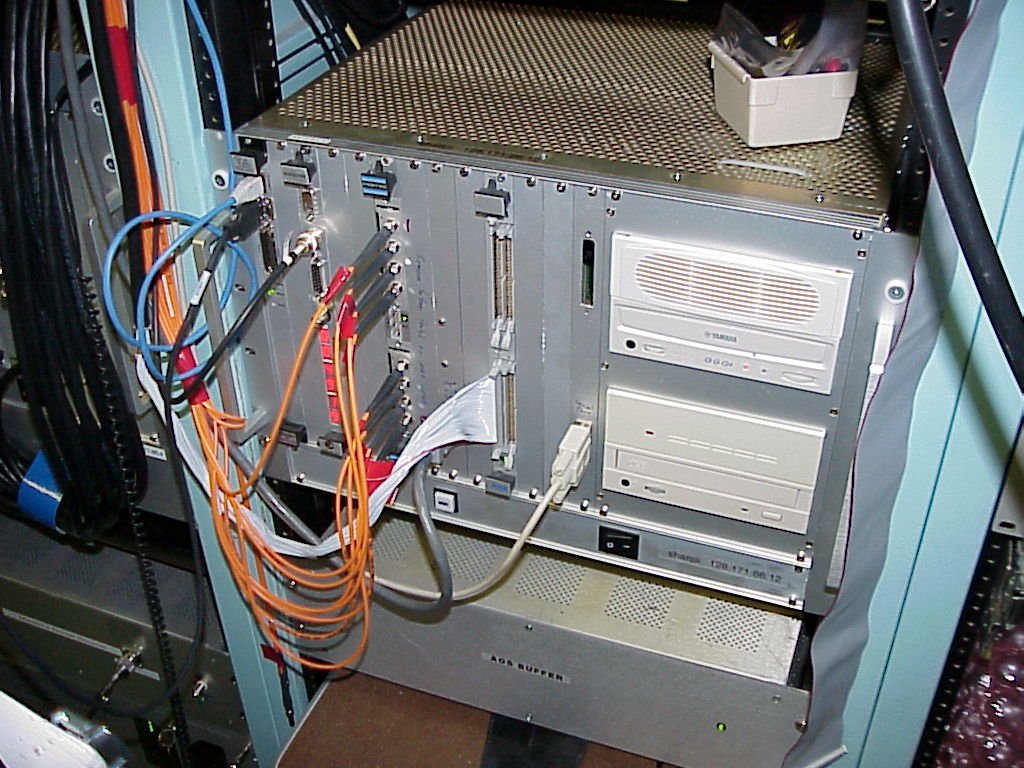
The sharcii
computer
can be found in the rack in the Receiver Lab (AOS room).
If the server is not running, log onto sharcii: "ssh
sharc@sharcii". Execute
"sharcii% cd ~/recycle" and
"sharcii% cycle".
Wait a few seconds, and a one-line message similar to "10 Minutes;Both;
500;One Shot;0;" should appear. (If you haven't noticed already,
sharcii is running Solaris, so typical UNIX commands will work.) WARNING:
Logging out of the session which started the server will abort the
server.
If the client is not running, log onto sharcii. Execute "sharcii%
cd ~/recycle" and "sharcii% gclient". In a few seconds, the
graphical
interface should appear. WARNING: Logging out of the session which
started the client will abort the client.
For a standard cycle, the "3He cycle only" and "4He cycle only"
boxes should NOT be selected. To begin a cycle immediately, make sure
"Start immediately" is selected, and press the "Start" button. To start
a delayed cycle, unselect "Start immediately", enter the number of
hours to delay, and press the "Start" button.
Novice users of the cycling program may wish to compare the GUI to
the following examples:
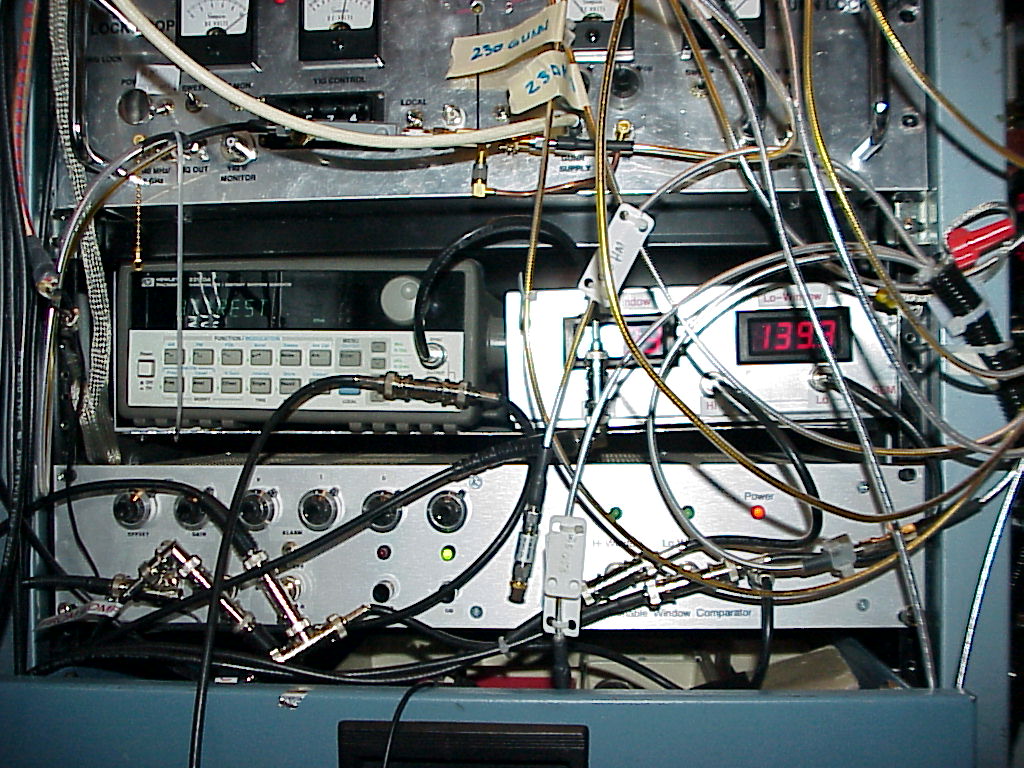
TROUBLESHOOTING INFORMATION: Cycling logs can be found on sharcii
in ~sharc/recycle/logs/. Temperatures can be read directly from
the Neocera front panel near the instrument; the left temperature
is a "charcoal pump" temperature (3He or 4He) which normally reads
6.7 K except when a cycle is taking place. (For the pump temperature,
there is a scale factor difference between the front panel and the
cycle logs.) The right temperature is the detector temperature which
normally reads 0.36 K in operation.
In the event that a cycle hangs in a state in which continuous heat
is applied to the refrigerator, the heating can be stopped by pressing
the Monitor button on the Neocera front panel.
Starting the DSOS Server
As stated in the DSOS
instructions, the DSOS daemon (dsosd) and server (rdsoss) should be
started on tpick prior to starting the IRC server and client.
Powering Up the
Electronics
The amplifier electronics runs from a battery and
is powered up manually. First, make sure that the big
power switch on the analog
electronics control chassis is "OFF". (The battery
cable should be plugged
in
already.) At the alidade power
controller, switch the battery
from "charge" mode to "operate" mode. On the analog electronics
control chassis, you should see one yellow light and two green. If not,
switch the
power controller to "charge" and call for staff assistance.
Assuming you see one yellow and two green lights, wait
approximately 15
seconds for the cold electronics to pre-heat. Then switch the big power
switch to "ON". You should now see one yellow, two green,
and two red lights. If not, move the switch to "OFF", switch
the power controller to "charge", and call for staff assistance.
The remaining configuration steps are done with software control.
More
detailed information
concerning the SHARC II electronics is available.
Programming
the Instrument
Electronics
Log into sharcii: "% ssh sharc@sharcii".
Execute "sharcii% cd ~/fpga"
and
"sharcii% go". This configures
the amplifier electronics and
multiplexer, defaulting to high-gain mode. To switch to low gain (to
observe the Moon, for example), execute "sharcii% all_gain lo". To
switch back to high gain, execute "sharcii% all_gain hi".
The instrument will power up with an incorrect hardware level,
which results
in increased current draw from the batteries. See the hardware
leveling instructions to correct this (after starting up IRC).
Checking the Optics
SHARC II has an internal filter wheel operated by
a black
knob on the top of the cryostat.
The
following table shows the conversion of counter value to filter
setting:
000 = future 350 micron pupil imager (no longer blank; don't use this)
250 = 350 microns
500 = 450 microns
750 = 850 microns
The filter wheel is adjusted BY HAND ONLY. The IRC software does NOT
change the setting.
Although the default bias voltage setting (255) will work
acceptably at
850 microns, a setting of 100 will give greater responsivity. To
change
the bias setting, log into sharcii -- "% ssh sharc@sharcii" -- and
execute "sharcii%
cd ~/fpga" and "sharcii% all_bias 100 100". To restore
the bias
voltage
to the optimal value for 350 microns and 450 microns, use "all_bias 255
255".
Be sure to use the same bias setting for your target and flux
calibrator.
After checking the filter setting, check the SHARC II optics to
insure nothing is blocking the beam and that the tertiary mirror
directing
the beam to SHARC II is in place. Tie up loose wires which
could get in the beam. Assuming the weather is dry, you should also be
opening the shutter (looking east if the Sun is still up) to let the
telescope cool.
Resetting the DSP Code
At the beginning of each night, the DSP
code should be reloaded into the DSP hardware in
the sharcii computer. To do this, log into sharcii as user sharc.
Execute "sharcii% cd ~/DSP".
Next, execute "sharcii% sharcDSP",
which takes tens of seconds to execute. If this doesn't work after a
few tries, try "sharcii% conf4290"
first. If this still doesn't
work after several tries, as a last resort try using a small tool to
press
the reset
button ("Rst") half-way down
the
Pentek
board in sharcii, then execute
"conf4290" and "sharcDSP" again. Please use
precaution to prevent
static discharge onto the Pentek board.
Optional, but recommended: Status of the DSP can be monitored
by the "s2"
program in the same directory. To view frame status, execute
"sharcii% s2" in the DSP
directory, then at the prompt
"SHARC2>status". You may wish to compare to an example
status screen. Note
the values of 12 and 36 in the sample size field, and note the
incrementing of sequence numbers and universal time between the status
commands. If
you see
no 12's, then the multiplexer
is probably
off or
not configured (which is done by "fpga/go").
If the time is not updating, try the reset procedure again.
Execute "SHARC2>quit"
to leave the DSP monitor, or type
"SHARC2>help" to
see other menu options.
NOTE CONCERNING DSP TIMING: The DSP code reads the time from the
WWV/IRIG-B board at the time of executing "sharcDSP". After that,
the code counts A/D samples to keep track of the time. If for some
reason samples are missed (e.g., due to pulling out the fiber optic
cables), then the DSP time will be incorrect, and bolometer samples
will not be timestamped correctly. If you suspect a timing problem
(which usually results in multiple images of a source or a missing
source), then reloading the DSP code is one possible solution.
Starting the Acquisition Software (IRC)
IRC requires a server running on sharcii and a graphical client running
on another machine. To start the server, log onto sharcii (user sharc)
and execute "sharcii% cd irc"
and "sharcii% sharcServer". To
start the
client, log onto the appropriate machine (currently
sharc@kilauea, sharc@champinux, or guest@champinux) and execute
"kilauea% cd irc"
and "kilauea% sharcClient".
(The preferred machine for running the IRC client is currently kilauea,
although champinux can also be used for the client.) See the
readme file on both
machines for alternate versions of the client and server. We
sometimes use the beta versions "sharcServerTest" and
"sharcClientTest", if there is reason to believe they are better.
The IP number of champinux is 128.171.86.224.
The sharcServer shows up as a j2re1.4.1 process on sharcii, visible
by "sharcii% ps -ef | grep j2".
The sharcClient shows up as many j2sdk1.4.2 processes on kilauea,
visible by "kilauea% ps
-ef
| grep j2".
Next...
Procede to the observing section.
Special
Considerations for the First Night
Window Ice
If the instrument was cooled down in humid conditions, there may be ice
or water on the white, translucent window
on the underside of the instrument. Use a Kimwipe to gently wipe away
ice or water. In the case of thick ice, you may try isopropyl alcohol
on the Kimwipe to remove the ice faster. Please DO NOT use stronger
solvents or a heat gun.
Normally, a small fan blows onto the window to prevent moisture
accumulation. If this is not installed, ask the staff for help.
Warm Detector
Following the intial cooldown, it takes many days
for the detector to passively cool to 4 K. (This will be noticed
as a "detector" temperature between approx. 10 K and 100 K on the
Neocera front panel or the cycling gclient display.) You will
want to actively cool the detector instead. One approach
is to execute a "3He
only" cycle
cycle
to force detector cooling. After the "3He only" cycle, wait for
the detector temperature to drop below approx. 8 K before proceeding.
If one "3He only" cycle was not sufficient to drop the temperature
below 8 K, try another one. Once the temperature is below 8 K, follow
with a standard cycle.
In August 2003 and January 2004, the first standard cycles ran
succesfully, but the detector took several hours to cool below 0.4 K,
and the liquid 3He ran out prematurely. This problem disappeared
by the next day. The best explanation is that there is a
component which is poorly heat sunk and causes a transient load on the
3He system. Performing the first 3He cycle as much as a day in
advance is a suitable way to address this problem.
Setting Up the champinux and sharcii Drives (for CSO/Caltech staff) --
THIS NO LONGER APPLIES, AS OF 2009; BACKUP DRIVE ON LAPAKAHI/KILAUEA
The transfer (removable backup) drive can be "hot swapped" into
champinux.
Insert the drive, use the key to lock it in place and turn it on, then
log in to champinux. First execute "champinux% sh
~sharc/bin/rescan_scsi_bus.sh", then "champinux% mount /home/transfer". Data
reduction accesses the transfer drive.
To mount the sharcii drives, continue the root login to champinux
and execute "# mount /home/data0" and "# mount /home/sparc". THIS
PARTICULAR PROCEDURE IS NO LONGER RECOMMENDED, BECAUSE IT FACILITATES
ACCESSING THE SHARCII DRIVES DURING DATA ACQUISITION, WHICH CAN
CAUSE DATA DROPOUTS.
To mount the transfer drive on sharcii -- which is necessary for
automatic data backup -- log in as root to sharcii, then execute "#
mount /home/transfer". It may
be necessary to execute the following
sequence as root on champinux: "# cd
/etc/init.d", "# ./nfs stop",
and
"#
./nfs start".
Configuring the Data Backup Directory (for CSO/Caltech staff)
Edit the following file to change the directory for data copying:
/home/sharcii/sharc/irc/v*/app/server.plist
The parameter of interest is "sharc.copy_directory".
Observing Procedure
Telescope/UIP setup
The default UIP configuration for SHARC II can be
obtained with the following commands:
UIP> INST SHARC2
UIP> cat user:[SHARC]sharccal.cat
The second line is needed only if you do not log in via the SHARC account. Please see the CALIBRATION web page for more information on this IMPORTANT catalog command. Note that "INST SHARC2" wipes out any focus refinements ("FOCUS
/OFFSET={offset}") and pointing refinements ("FAZO" and
"FZAO") that you may have made. A typical SHARC II antenna monitor
screen looks as follows:
 DATE   SEP/01/2004  DOY 245 MJD  53249  AAZ      +216.8346  AZA       +59.7708
 UTC     07:49:57.6  DAT  32 DUT -0.450  RAZ      +216.8359  RZA       +59.7702
 LST     20:11:18.6                      EAZ(")        -4.8  EZA(")        +1.9

 RAO           +0.0  DECO          +0.0  SOURCE    SGRASTAR  EPOCH       2000.0
 GLO           +0.0  GBO           +0.0  RAEP   17:45:40.04  DECEP  -29:00:28.1
 AZO           +0.0  ZAO           +0.0  RA     17:45:57.62  DEC    -29:00:43.8
 FAZO        -124.6  FZAO         +47.3  HA    +02:25:20.97  P ANGLE   +40.0077
 TAZO          +6.5  TZAO        -146.3  SWEEPING            CELES
 POINTINGSHARC2_NAS  REFRAC        66.0

 CHOP AZO      +0.0  AIR MASS     2.006                      BAROM        627.6
 LCAS APA  +90.1993  RCAS APA -132.1957                      TEMP          +3.2
 LCAS RPA   +0.0000  RCAS RPA   +0.0000  SWP AZO       -9.6  HUMID         12.2
 LCAS OFF   +0.0000  RCAS OFF   +0.0000  SWP ZAO      -56.2  TAU
225      0.079
 LCAS MODE    FIXED  RCAS MODE    FIXED                        AT    07:43:00.0
 X POS       -10.80  THETA       +90.00                      WIND PK        0.0
 Y POS       +11.87  FOCUS        -4.03  FOC MODE  CONSTANT    AT    00:00:00.0
 Y OFFSET     +0.30  FOC OFFS     +0.00  BSW   NOT CHOPPING  TLENGTH     -0.001
 ______________________________________________________________________________
Some possible deviations and their solution:
- POINTING not SHARC2_NAS (first column, middle) -- Execute
"UIP> POINT SHARC2_NASMYTH".
- FOC MODE STEALTHY or FOC MODE FIXED (third column, bottom) --
Execute "UIP> FOCUS /CONSTANT".
- CHOPPER ALARM (third column, bottom) -- Check
in the sidecab that the chopper
state is
"analog" and, if the red "stop" LED is on, press the "go"
button.
- TLENGTH large and flashing (fourth column, bottom) -- The dome
azimuth got too far from the telescope azimuth. There is some
troubleshooting information on the main CSO web page.
Observing Modes
Acquire the target with "UIP> OBSERVE ..." or "UIP> PLANET ...".
For SHARC II, it is always necessary to have a scan pattern
(SWEEP or BOX_SCAN) running in order to collect useful data.
Some suggested
scan patterns are available.
Preparing and Starting and Integration
One of the important actions you will need to do with IRC is to
level the hardware. If the bolometer signals are greater than 1 V =
1000 mV in absolute value, it is recommended to run "Level Hardware",
since the A/D converters saturate at +-3.5 V = +-3500 mV. To
examine the mean bolometer signal, look at the raw
bolometer array readout, which
has units of mV, or the bolometer
frame
medians display (graphical display and bottom line of table), which
has units of V. Re-leveling is necessary when the gain is changed
(high to low, or low to high), or when the optical loading is changed.
While tracking a source, it is typical to hardware level every 20-60
minutes. Hardware leveling should not be done during an
integration.
The integration parameters are set with the SHARC
controls window. The most
common integration type is "Single, Preset Time". As of this
writing, the true integration time is approximately 20 seconds less
than the requested time. Before starting the integration, you
may wish to set some of the documentary features, such as Filter,
Observer,
Project, and DSOS
status.
Begin an integration with "Start". Selecting "Copy
Observation
Files" performs automatic backup to kilauea or lapakahi (currently
/halfT). An integration is complete when the integration file
name appears in the sharcServer monitor window, and, if automatic
backup is selected, when "Copy complete" appears.
Pointing and Focusing
A quick-look reduction facility "sharcpoint" is available to evaluate
the image and facilitate pointing and focusing. To initiate
sharcpoint, log into kilauea as sharc: "kilauea% ssh sharc@kilauea".
From the home directory, execute "kilauea% sharcpoint #####",
where ##### is the five-digit scan number to reduce. At the
completion of the data reduction, ds9 is launched to show the resultant
map, and the results of an attempted Gaussian fit to the center of
the image are shown. If the signal-to-noise is sufficient, you
will receive useful suggested pointing offsets for the telescope (FAZO
and FZAO, which can be adjusted using the UIP commands of the same
names). The focus can be adjusted with "UIP>
FOCUS/OFFSET=#.##"; you may
wish to review a focus
record
from November 2002.
In unusual circumstances, it may also be necessary to adjust
"UIP> Y_POS/OFFSET=#.##" and "UIP> X_POS ##.##". Note that after
an XPOS command, the focus mode will have
to be changed to constant again: "UIP> FOCUS /CONSTANT".
If the source is well off the center of the map from "sharcpoint"
(i.e., the pointing was bad), the suggested pointing offsets may be
incorrect. (Look at the fit position, amplitude, and FWHM to see
if they are sensible.) You can bring the source back into the
center
by trial and error:
To move the source to the right, decrease FAZO.
To move the source to the left, increase FAZO.
To move the source up, increase FZAO.
To move the source down, decrease FZAO.
If sharcpoint does not seem to work, check the code (it is a shell
script), and carefully make any necessary changes.
DSOS Operation
If you haven't done so already, set up the DSOS according to the instructions
on the web page.
Additional Notes on IRC (for CSO/Caltech staff)
The server and client logs are available in:
/home/sharcii/sharc/irc/v*/app/SHARC_IRC/IrcLogs/     (server)
irc/ircData/sharc/IrcLogs/     (client)
Many configuration settings are defined in:
/home/sharcii/sharc/irc/v*/app/server.plist
The "work space" files which save the state of IRC can be found in:
/home/sharcii/sharc/.irc/sharc_v*/workSpaces/
.irc/sharc_v*/workSpaces/
Data Reduction
Data reduction at the observatory is currently performed on kilauea.
NEED TO REVIEW LOCATION OF RELEVANT FILES
NEED A LINK HERE TO CRUSH
Pointing and Calibration References
The following planets and moons are available in the UIP (through 2003
at least) and can be used for pointing and flux calibration: MERCURY,
VENUS, MARS, JUPITER, CALLISTO, GANYMEDE, EUROPA, IO, SATURN, TITAN,
NEPTUNE, and URANUS. Caveats: Mercury is
usually difficult to observe, and little is known about it as a flux
calibrator. Venus, Mars at opposition, Jupiter, and Saturn are not
ideal for calibrating point sources due to their extent. Europa and
Io are difficult to observe due to their proximity to Jupiter; Titan,
Ganymede, and Callisto sometimes have the same problem.
Positions of the planets and their satellites can be located with the JPL Horizons System.
For observer location, select "Mauna Kea" (code 568).
"Current" positions of the planets (occasionally updated):
Date:  2008 Sep 15

    Source        RA     Dec      Ang. Diam. (")
--------------   -----  ------    --------------
(Sun             11:32    3:01)
Mercury          13:05  -10:11         7.49
Venus            13:10   -6:49        11.34
Mars             13:04   -6:23         3.82
Jupiter          18:54  -23:10        41.76
Callisto                               1.40
Ganymede                               1.54
Saturn           11:01    8:10        16.09
Titan                                  0.xx
Uranus           23:26   -4:31         3.69
Neptune          21:38  -14:32         2.34
Some asteroids can be used for pointing and, if good models are
available, flux calibration. The following asteroids are available in
the UIP, at least through 2005: AMPHITRITE (29), BAMBERGA (324), CERES
(1), DAVIDA (511), DESIDERATA (344), EGERIA (13), EUNOMIA (15),
EUROPA52 (52), HERCULINA (532), HYGIEA (10), INTERAMNIA (704),
JUNO (3), PALLAS (2), PROKNE (194), PSYCHE (16), VESTA (4). Some
asteroids
are only useful when near closest approach to the Earth. See Redman et
al. (1995, AJ 109:2869) for dates of opposition and predicted 1.1 mm
fluxes
for major asteroids.
"Current" positions of the asteroids (occasionally
updated):
Date:  2008 Sep 15
    Source        RA     Dec      Ang. Diam. (")    Est. Flux (Jy)
--------------   -----  ------    --------------    --------------
Amphitrite 29   10:00   15:19        0.087
Bamberga 324    16:35  -31:01        0.128
Ceres 1          8:59   22:14        0.404              *
Davida 511       8:26   19:10        0.142
Desiderata 344  14:43  -22:03        0.080
Egeria 13        8:34   30:59        0.100
Eunomia 15      10:56   -0:28        0.090
Europa 52        0:07   -8:00        0.188              *
Hebe 6          12:05    7:27        0.066
Herculina 532    4:25    4:38        0.115
Hygiea 10        5:02   25:36        0.172              *
Interamnia 704   9:37    5:30        0.107
Iris 7          14:05  -15:12        0.076
Juno 3          17:10  -10:08        0.106
Pallas 2         5:06  -11:36        0.347              *
Prokne 194       6:48    5:52        0.079
Psyche 16 M     15:27  -15:58        0.100
Vesta 4          3:01    6:45        0.417              *
The brightest blazars are useful for pointing, but only useful for flux
calibration if they have been recalibrated vs.
a standard within the last few days. Here are some useful links for
identifying bright blazars:
SMA compilation -- try this first
BIMA list
IRAM list
Evolved stars, (proto)stellar condensations, and some galaxies can be
used for flux calibration. I recommend the following: CRL618, OH231.8,
IRC+10216, CRL2688, GL490, HL Tau, IRAS16293-2422, G34.3, and ARP 220.
Most of these sources can be found in Sandell,
MNRAS 271:75 (1994), although note the larger 350 micron beam in that
reference.
SHARC II measurements
of 350 micron secondary calibrators
Shutting Down for the Night
Following is a shutdown checklist:
- Start closing the shutter first. Point the telescope out of the
Sun if you took one scan too many.
- Park the telescope: "UIP> STOW",
or pick your favorite AZ/ZA.
- Switch the big power switch on the analog electronics control
chassis to "OFF" , and switch the power controller to "charge".
This is the inverse procedure of the beginning of the night.
- Turn off the DSOS if you used it. (Hopefully you did.)
- Set up a delayed 3He cycle, if desired. Remember that the
recycling server and client processes are killed when
you log out of the window from which they were started.
- Leave any necessary messages for the staff regarding the 3He
cycle, cryogen servicing, or instrument problems.
- When the telescope is stationary and the shutter closed, push the
red stop button.
Cryogen Servicing (for CSO/Caltech staff)
Normally, the CSO staff handles cryogen servicing. It's a good idea to
keep in contact with them about the schedule and to plan for weekend
servicing. Please service cryogens yourself
only if you are trained by the staff and wear the proper safety
equipment.
Liquid Nitrogen
The liquid nitrogen reservoir needs to be topped off every day. I
prefer to fill it early in the day, or to fill it with the cryostat
moderately tipped. Otherwise, a fair bit may spill on the electronics
and floor if you observe a high source early in the night. The nitrogen
fill port is in the middle of the cryostat, and the reservoir capacity
is 7 liters.
Liquid Helium
SHARC II needs liquid helium every other day during active observing.
The helium level should be at least 3 inches
(measured with the cryostat vertical) at mid-day before 3He fridge
recycling and observing. The helium fill port is the one closest to the
edge of the cryostat. The helium is easiest to fill at a zenith
angle near 35 degrees. The reservoir capacity is 11 liters.
In the case of a suspected ice plug in the SHARC II helium
reservoir, CALL STAFF IMMEDIATELY FOR ASSISTANCE. Ice plugs can
eventually result in a cryostat explosion. The distance from the bottom
of the reservoir to the exit hole is 20.5 inches, and the reservoir is
7
inches deep.
Please replace the downward-pointed black rubber hose assembly
after filling
the liquid helium. This helps prevent ice plugs.
Troubleshooting
Source suddenly disappeared or signals suddenly went haywire
Check the 5 LED's on the analog
electronics control chassis. If you see something less than 1
yellow, 2 green, and 2 red, then
a fuse probably blew. Turn the big
power
switch to "OFF", switch the power
controller to "charge", and call the staff for help. NEED A
LINK TO PHOTOS
HERE.
Bolometer signals aren't updating on the IRC Sharc Client display
First, check that signals are passing through the DSP. This
procedure is explained elsewhere. If the "s2"
program shows incrementing sequence numbers, then the DSP and A/D
are OK, and the problem is related to the IRC software. If the
sequence numbers are NOT incrementing, the problem is related to the
DSP and A/D.
If the sequence numbers are not incrementing, first try restarting
the DSP code. If that doesn't help, the next suspect is the
A/D hardware. Check the Topward
A/D
power supply to insure that the voltages are set at -7.0 and +6.0
volts, and that the currents are 2.5+-0.4
amps. Check that the orange fiber optic cables are connected
between the A/D
box and sharcii
computer -- 8 on
each side,
leaving 2 spare cables out of the bundle of 10. Finally, press
the small, red "reset" button on the A/D box. If none of these
work, then the problem probably needs help from the CSO staff. If
you have managed to get things working again by fiddling with the
hardware, restart the
DSP code again to make sure the time synchronization is correct.
CASE OF MUX OFF
CASE OF ONE DSP WITHOUT DATA
Miscellaneous Notes
Observing Log Sheets
Here is a paper log sheet template provided by Colin Borys:
Estimating Weather Conditions with SHARC II
If the default bias (255 digital setting = 1 V) is used in combination
with the 350 micron filter, and assuming a hardware level has been
successfully run since the IRC client was started, then a real-time
"SHARC Tau" can be derived from the bolometer
median window. The Bolometer Power Median value (top line of
the table) can be converted to atmospheric opacity with the following
graph:
The average bolometer voltage is related to the radiation load on the
bolometers, which is related to the atmospheric opacity.
This file last updated on